Before using the application for the first time, you need to set up at least one Season, two Teams and some players.
SEASONS:
To Add a Season, from the main page hit the Settings button, and on the new page hit the Seasons button. You should see a page similar to the following (however you'll have no entries):

Click the Edit button in the top right corner, and then the '+' button in the top left corner. This will bring you to the 'Add Season' page.

Simply fill in the details. The Description is whatever will help you recognize the season you are referencing. You can add one season and run multiple teams if you wish. However I would recommend adding a Season per team you are running (e.g. 2010-2011 Atom, and 2010-2011 PeeWee). This will make it a little easier when you're adding the opponent teams.
Once you're done, make sure to hit the Save button. This will bring you back to the list of Seasons. Hit the '+' to add another, or hit the 'Done' button to finish editing. If you ever want to delete a season, in Edit mode you hit the little red button next to the Season name and then the Delete button that appears. WARNING: Deleting a Season will delete all Teams, Players and Games for that season so you will lose all the stats.
If you ever want to change the Season information, click on the entry in the list and it will bring up the details for you again. Edit them and hit Save...
TEAMS
After you have added a Season, you're ready to add Teams. Before you can play any games you need at least one 'Team' and one 'Opponent'. You can theoretically use the same generic opponent for every game, but that will make many of the reports useless so I recommend creating an opponent for each team you face. That way you can track your results against them as the season goes on.
From the Settings menu, select the Teams button. This will bring up a window asking you to select a Season. Hit the button on that page and a scroll picker will appear with a list of all the seasons you have added. Select the Season and hit OK.

After picking the Season you will see a list of Teams for that season. Initially it will be blank:

To add a team, hit the Edit button and then the '+' button and you will be taken to the Add Team screen. Fill in the details of the team. If this is the team you are tracking, leave the Opponent switch set to 'Off'. If this is one of your opponents, obviously turn the Opponent switch to 'On'.


After you're done, hit Save and you'll be taken back to the Team list page. Your new Teams should appear. Controls for editing or deleting teams are the same as described for editing or deleting seasons above. Note that deleting a Team will delete the Team, Players and Games for that Team so you will lose that information. Obviously the Season will remain intact so any other teams you are tracking in that Season will not be affected.
Once you have created your Team, you're ready to add Players.
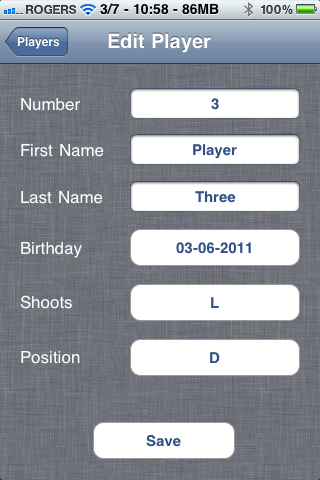
PLAYERS:
From the Settings menu hit the Players button. You will be asked to select a Season and a Team. This will bring you to a list of players for that team which, of course, will initially be empty.

Hit Edit, then '+' to add your first player. Fill in the details - don't worry if you don't have everything available, you can always go back and edit later. The most important is player number and name. Once done, hit Save (not the 'Player's button in the top left, that will NOT save your changes). Repeat for all the players on your team.
Repeat for all of the players on your team. You can always add players later and they will automatically show up in games they missed as 'Did Not Play'.

Editing and deleting players is similar to what was described for Seasons above. Deleting players will cause all their stats to be lost but will not affect other players on the team.
How many players can you enter for a team? Can you do up to at least 20?
ReplyDeleteI don't impose any limit so you can have as many as you want. I just tried 21 to make sure and it works fine. The only problem is that you'll be scrolling a bit more to do the stats. On the iPad version in landscape mode you'll fit 19-20 without scrolling.
ReplyDelete